Diamontis FX
Practical guides

Documentation: receive, issue and archive your electronic invoices

Discover step by step how to use Diamontis FX for every invoicing situation.

1

Receive your supplier invoices

As soon as you connect, your supplier invoices arrive automatically in your Diamontis FX workspace, via the Registered Platform - the PA, formerly known as a "partner dematerialisation platform" or PDP - and the DGFiP central directory.

Steps

1
Your supplier issues an invoice They send an invoice to your SIREN via their own Registered Platform. The DGFiP central directory automatically routes the invoice to the PA that hosts you.
2
The PDP receives and checks it The Registered Platform checks the format (Factur-X, UBL or CII) and the mandatory information. It sets the invoice to the "Deposited" status.
3
The invoice appears in Diamontis FX You receive a notification and find the invoice in your dashboard, with all its line items, amounts and VAT data displayed clearly.
4
You process and archive it Approve or reject the invoice. It is automatically archived with legal evidentiary value for 10 years in its original form.

Flow diagram

Supplier Issuing PA DGFiP directory SIREN routing PDP Receiving PA Diamontis FX Receipt + display Review Approval + 10-year archiving PPF (DGFiP) Tax data Invoice flow Tax data
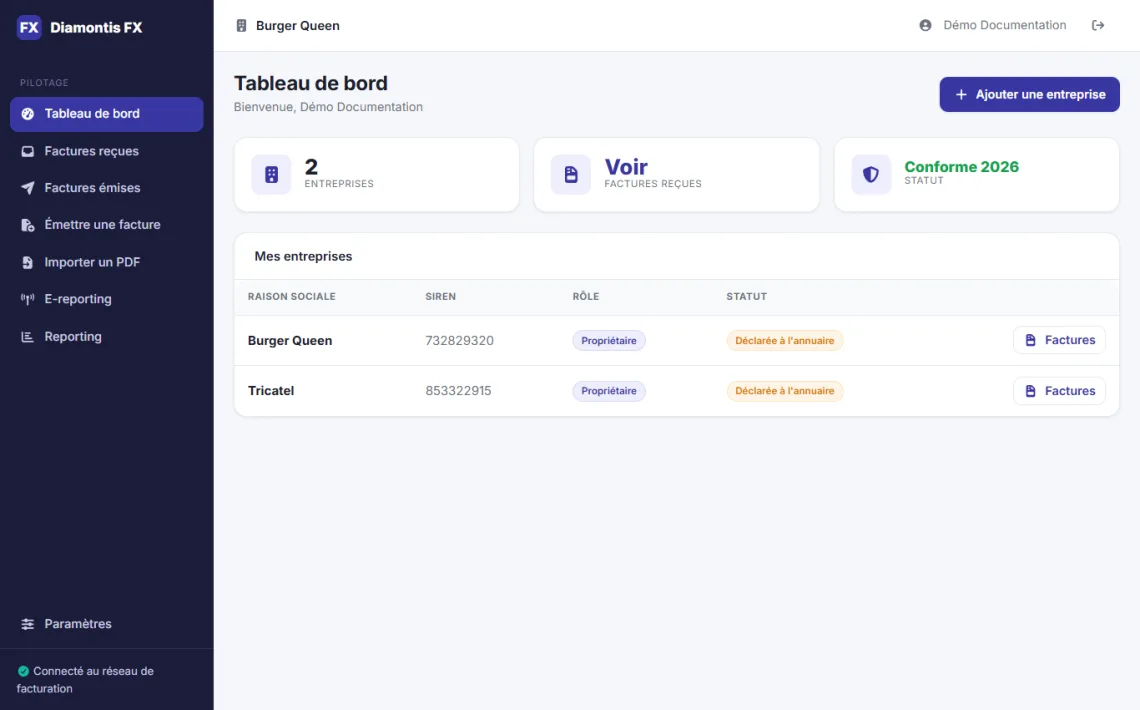
Diamontis FX dashboard showing linked companies and their connection status
The dashboard - your companies and their connection status at a glance.

2

Create and send a customer invoice

Enter your invoice line items, choose the recipient from the directory and send your invoice in Factur-X format via the Registered Platform, in just a few clicks.

Steps

1
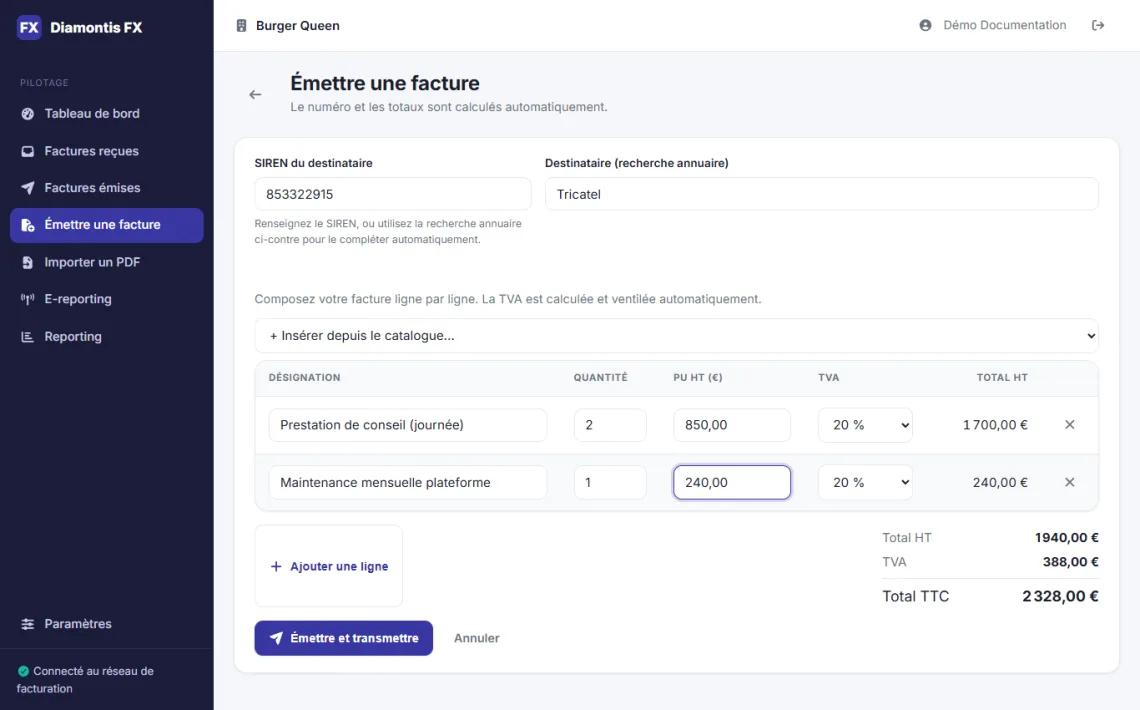
Create the invoice Enter the number, date and payment terms. Add line items from your product catalogue or enter them manually. VAT is calculated automatically.
2
Choose the recipient Enter your customer's SIREN or company name. Diamontis FX queries the DGFiP central directory to retrieve their official receiving address.
3
Factur-X conversion The invoice is converted to Factur-X format (EN 16931 / COMFORT profile) or UBL depending on the recipient's preferences. A human-readable PDF is generated at the same time.
4
Transmission and tracking The invoice is sent via our PA to the recipient's own. You track its status in real time: deposited, made available, approved or collected.

Flow diagram

Diamontis FX Entry + catalog DGFiP directory Recipient address PDP Issuing PA Recipient PA Peppol interoperability Recipient client Received in their PA Statuses: Deposited, Approved, Collected...
Invoice creation form with line items, VAT and totals calculated automatically
Invoice creation - line-by-line entry with automatic calculation of VAT and totals.

3

Upload an existing PDF invoice to send it

Already have an invoice in PDF? Upload it: Diamontis FX automatically extracts the key information, lets you validate it, then sends the invoice in the required regulatory format.

Steps

1
Upload the PDF Drag and drop your PDF invoice into the interface. If it already contains XML data (Factur-X), it is extracted directly. Otherwise, automatic analysis begins.
2
Analysis and extraction The system detects your customer's SIREN, the amounts excluding VAT, the VAT, the references and the line items. Recognized fields are pre-filled automatically.
3
Validation and correction Check the extracted information, correct any errors and complete the missing fields (nature of operation, payment terms).
4
Electronic transmission Confirm the transmission. The invoice is converted to Factur-X format and sent via the PA, exactly like an invoice created directly in Diamontis FX.

Flow diagram

Your existing PDF Drag and drop Automatic analysis SIREN, amounts, line items, VAT User validation Correction + confirmation Factur-X submission Via the PA
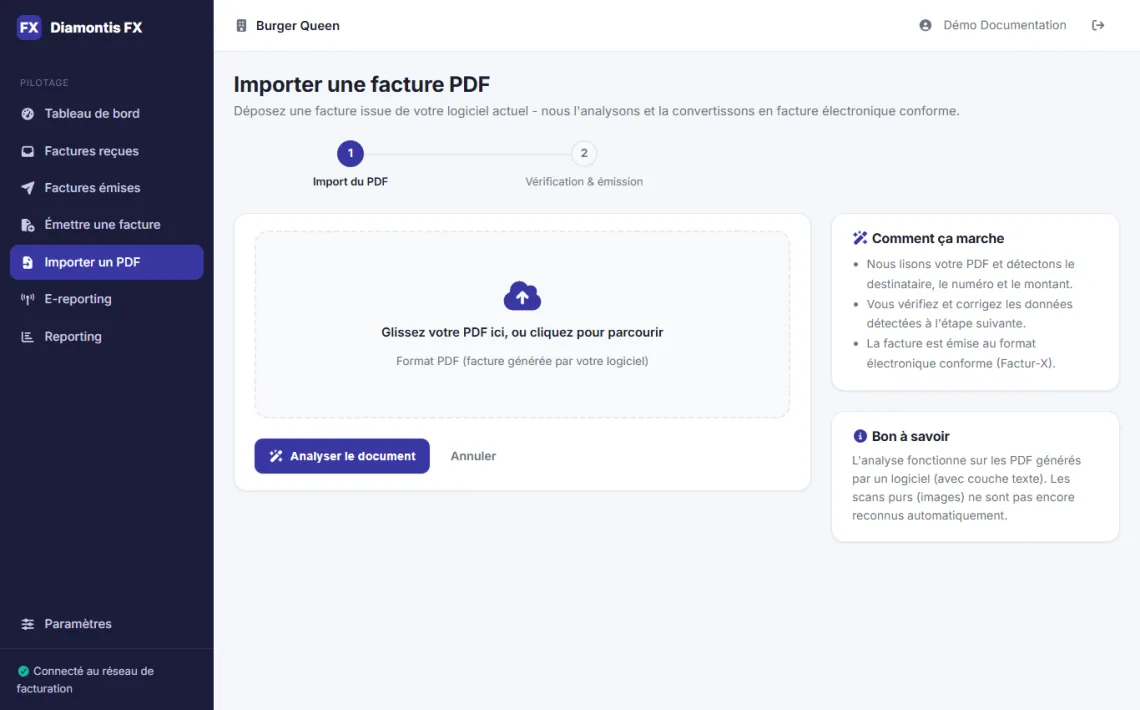
PDF invoice import page with a drag-and-drop area and automatic document analysis
Importing an existing PDF - drag and drop your invoice, automatic analysis does the rest.

4

Track an invoice's lifecycle

Every invoice goes through standardized statuses (AFNOR XP Z12-012). Diamontis FX displays them in real time and lets you act on the ones that concern you.

Main statuses

D
Deposited The invoice has been received and technically accepted by the Registered Platform. It is awaiting release to the recipient.
MD
Made available The invoice is now accessible in the recipient's workspace. The payment term countdown begins.
A
Approved The recipient has validated the invoice. It is ready to be paid.
R
Rejected The recipient has rejected the invoice for a business reason (amount, reference, etc.). A credit note or a corrected invoice can be issued.
PT
Payment transmitted Payment data has been sent to the Registered Platform. This triggers the VAT-on-payments-collected declaration where applicable.
E
Collected Payment has been received. Payment e-reporting is automatically triggered to the DGFiP via the PA.

Lifecycle diagram

Deposited Made available Approved Rejected Payment transmitted Collected DGFiP e-reporting Note: a "Rejected" status is possible in case of a technical format error.
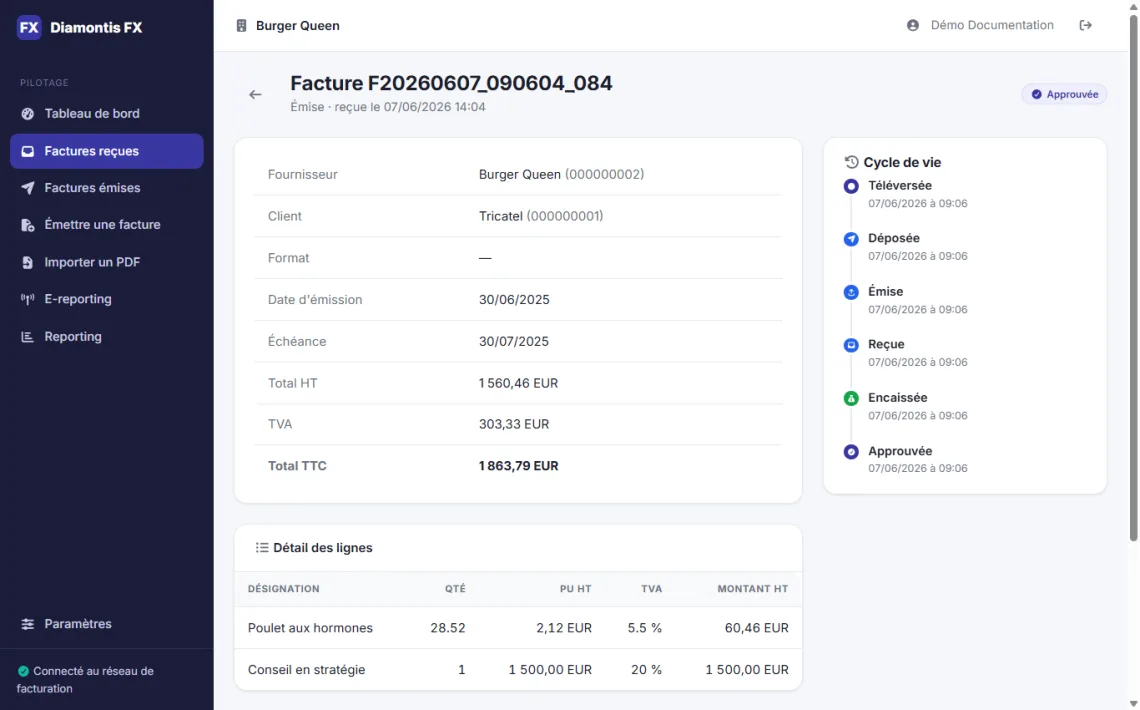
Invoice detail page with amounts, line items and a timeline of the status lifecycle
Invoice detail - amounts, line items and the full status lifecycle.

5

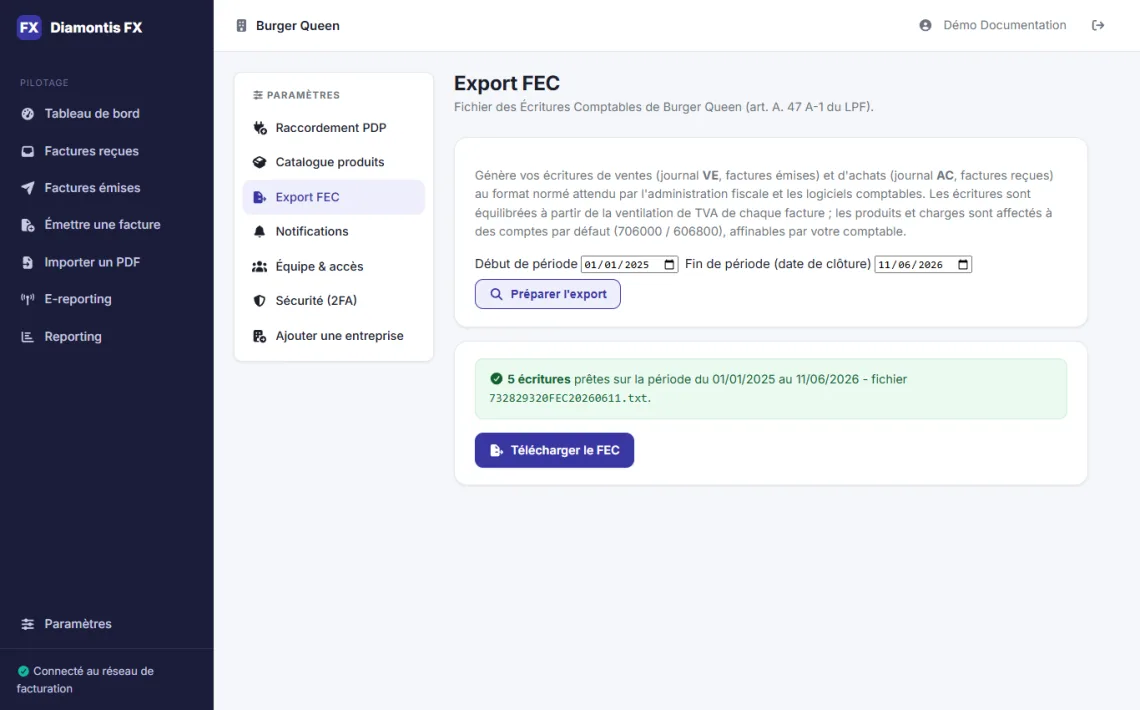
Export your accounting data (FEC) for your accountant

The Fichier des Écritures Comptables (FEC) is the regulatory format defined by article A.47 A-1 of the LPF (French tax procedures code), required during a tax audit and used by all accounting software.

Steps

1
Access the FEC export From your dashboard, click "Export" in the navigation menu. Select "FEC file".
2
Select the period Choose the fiscal year or a custom period (start date, end date). A summary of the number of invoices included is displayed before download.
3
Download the file The FEC file is generated in the standardized text format (tab-separated, UTF-8 encoding) and downloaded immediately. It includes all the sales and purchase entries recorded in Diamontis FX.
4
Send it to your accountant Send the file to your accountant or import it directly into your accounting software. In the event of a tax audit, hand it over as is to the inspector.

Flow diagram

Diamontis FX Issued + received invoices Period selection Fiscal year or custom dates FEC generation Format per art. A.47 A-1 LPF Accountant Tax audit
Settings page - FEC export with period selection and a summary of entries ready for download
FEC export - choosing the period and reviewing the summary before downloading the standardized file.

6

Sign up and connect to the Registered Platform

The guided 4-step sign-up sets up your account and your tax settings, selects your plan, and activates your connection to the PA via a timestamped designation mandate.

The 4 steps of the wizard

1
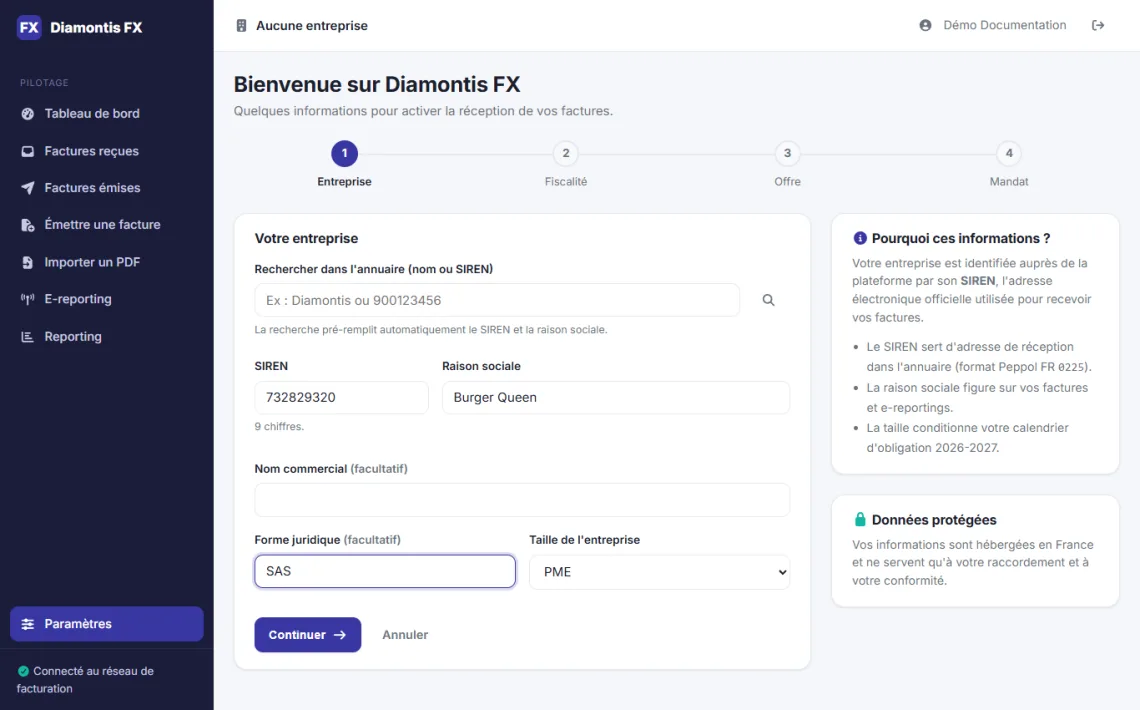
Your company Enter your SIREN. Your company's information (company name, legal form, address) is automatically retrieved from the INSEE business register and verified.
2
Tax settings Choose your VAT regime (monthly, quarterly, VAT exemption), set your usual rates and enter your intra-community VAT number.
3
Plan Select your plan (Reception - free, Pro at €7 excl. VAT/month or Business at €29 excl. VAT/month). Payment is secured via Stripe for paid plans. No commitment on a monthly plan; twelve-month commitment (two months free) on a yearly plan.
4
Designation mandate Read and electronically sign the mandate designating SuperPDP as your Registered Platform. This document is timestamped and archived with legal evidentiary value. The connection is then finalized automatically.

Connection diagram

1 - Company SIREN + INSEE verification 2 - Tax settings VAT regime + rates 3 - Plan Reception / Pro / Business 4 - Mandate Signature + timestamping PDP connection DGFiP directory registration Operational
Company step of the sign-up wizard with directory lookup and SIREN entry
Sign-up wizard - step 1, identifying your company by its SIREN.

7

Migrate from another Accredited Platform

Already under a mandate with another provider (PA or OD)? Switching to Diamontis FX is entirely possible, and we guide you through a seamless transition.

How the switch works

1
You join us You create your account, add your company and start connecting to our Accredited Platform (summary + KYC identity check). Nothing is cut off with your current provider at this stage.
2
DGFiP directory update Your company is registered in the official directory with Diamontis FX as the receiving platform, on an agreed effective date. From that date, your incoming invoices reach us; your former provider stops receiving them.
3
Recover your history Ask your former provider to export your invoices and archives, then bulk-import your PDFs into Diamontis FX. You centralise your whole history in one place, without re-keying.
4
Seamless verification We check with you that the directory points to Diamontis FX and that no invoice is lost during the switch. Once validated, you can safely terminate your former mandate.

Switching via the directory

Former PA / OD stops receiving DGFiP directory platform change Diamontis FX new receiving Switch on a chosen effective date, no double reception, no downtime.

We support you
Our team drives the switch with you: choosing the effective date, checking the directory and recovering your history. Contact us BEFORE terminating your former provider for a seamless transition.

Ready to get started?

Create your account for free and become compliant with the September 1, 2026 reform in just a few minutes.